Monday, May 24, 2010

Polk-a-dots Unaware

A friend was visiting from out of the country and did not remember my polk-a-dot table from our old house. She said, “You need to put that on your blog!” I had never thought about it and forgot again until I read about The CSI Project. It’s a group blog by three amazingly creative bloggers who post a creative challenge weekly. The judges are other amazingly creative bloggers. The first week’s challenge is paint.

Visit thecsiproject.com

So that’s where the polk-a-dot table comes in! I needed a narrow table for a hallway. We had bought a barrel (literally) of painted wooden table legs years ago. My husband and I went through our wood stash that came out of or with our house built in 1935. We found some old white clapboard and some narrow boards that had gotten spray painted behind some peg board. Did you know that makes polk-a-dots? These and some lime green narrow trim combined to make a fun eclectic table for our hall. Now it resides in our living room:

DSCF6606

DSCF6607

DSCF6610

DSCF6604 

We’ve been on the look out for peg board here in Portugal and haven’t found any yet! I’d like to recreate the dotted look on future furniture re-do’s. My wonderful husband is ready to make our own peg board! Someone want to ship some over so he doesn’t have to do that?

Looking forward to other paint ideas at CSI!

Sunday, May 16, 2010

Apple of Your Eye

This week I found some amazing blogs and websites for preschool and kindergarten homeschooling with a definite Godly influence! (Click on the buttons for the links.)

abc button

coahbutton
totally tots

One of the ideas I started using right away was memory verses for each letter of the alphabet. We just finished going through the alphabet (about 1-2 letters per week), so it’s fun to have new material to put to use as we start over!

The verse for A was “Keep me as the apple of your eye…” Psalm 17:8.  Ever noticed you can see yourself in another’s pupil (apple of their eye) when you look in their eyes? This is what I explained to the girls--that this verse reminds us that we are always in God’s sight.

Today for our church time at home, we included this verse and a small craft to remind us of this truth. Based on the Totally Tots idea of an eye with an apple in the middle of the pupil, I printed out a large picture of an eye, the memory verse and then pictures of the girls cut in a circle for them to glue to the pupil. The girls glued each section on a piece of card stock and colored the iris (colored part of the eye). They promptly went to hang their reminders in their rooms by their beds!

DSCF6568 DSCF6569


One more recommendation to check out:  Songs for Saplings are songs of the alphabet verses listed on Totally Tots. We downloaded them on iTunes, and our girls are singing the songs (Scriptures) already! (See the In My Heart page for the link.) Worth every penny!

Saturday, May 15, 2010

Made My Own

I’ve seen a lot of cute necklaces lately on etsy and in blogland. One night I couldn’t go to bed before I took a quick assessment of old jewelry and buttons I’d kept. I came up with a small conglomeration of buttons I thought would go together.

First I laid them out on some felt and then sewed the buttons that had visible holes on with embroidery thread in a contrasting color. I used thread and/or hot glue for the other buttons.

DSCF6488

Then I cut the felt off up to the edges of the buttons so it wouldn’t be seen from the front.

DSCF6489

DSCF6490

I hot glued a ring to the each edge of the end buttons. Later I actually undid this and re-glued the ring to the top of the buttons so the necklace would hang better.

DSCF6493

This was the first finished product before  I relocated the rings. I also had to reinforce the “grouping” with hot glue under some of the buttons so it wouldn’t flop into 2 large sections.

DSCF6540

Now it hangs a little better on me. It was fun to utilize the stash and have a new necklace for free!

DSCF6542

I’m sharing this at         Join us Saturdays at tatertotsandjello.com for the weekend wrap up party!

Tuesday, May 11, 2010

To the Head of the Table

We have a hodge-podge of chairs for our dining room table.  There are four that match, three that match and a loner reject I picked up by the trash at a resale shop (if that shows how much it was rejected!).   My husband didn’t even want me to keep it. However, when another matchy chair’s cushion got damaged, the reject chair got brought in and put at the end where no one usually sits. Unless we have a full table that is!

DSCF6380

Embarrassed to think I’m showing you what we’ve allowed people to sit on for this long! Thankfully, not anymore! I had another chair I had become ready to re-do, so recovering 2 chair cushions seemed more worth the effort! Here’s the other chair which stands by a wall (beautifully) as a fill-in chair.

DSCF6381

Comparing fabric options for this project was pretty simple since both cushions popped right out allowing me to pseudo-cover them with different fabrics I thought might work.

DSCF6378

After some removal of fabric layers, cutting and stapling:

DSCF6423  DSCF6425


The printed floral fabric on the barley leg chair was originally a dinner napkin I bought at Crate & Barrel that I made into a pillow. I love this change!  The reject chair still needs a little care for its body, but its new look is nothing I’m ashamed of!

I’m sharing this at

     Furniture Feature Fridays

Monday, May 10, 2010

Yo-Yo’s to the Rescue

A few months ago, the stain remover spray I had been using left a big spot and a line on a favorite t-shirt of mine. I got away with wearing it under a jacket for a while but now that it’s spring I had to take some action.

I really like the look of yo-yo’s. Tatertots and Jello had a great tutorial on making them for embellishing pillow covers. Beautiful, huh?!

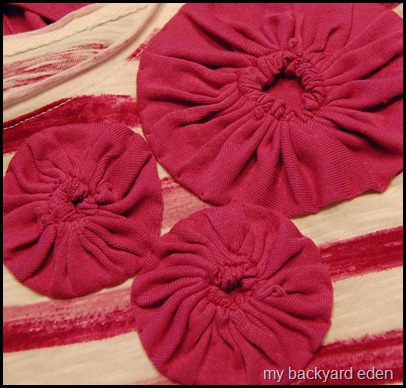
Then I saw how My Backyard Eden used yo-yo’s to embellish a t-shirt!

 Flower Yo yos

I decided to go for it!  I found some fabric in my stash that coordinated and used a large jar as my guide to cutting the circles (see the tutorials above for detailed instructions).

DSCF6484

It really didn’t take too much time, and they were rather simple to make! I think I might have to make some more!

DSCF6487

I used my machine to sew them on (around the center) as Carolyn at My Backyard Eden had suggested, mainly to keep them attached in the wash. I have to admit it was a bit challenging for me for sew around the bunched fabric in a nice circle. Maybe sewing the circle by hand would be better for me?  I also decided to wait on hand stitching the outer circle to the fabric because I think I like the way they look sort of free versus flat. We’ll see if I have to change that after I wash the shirt!

DSCF6501

Stain remover spot no more!

DSCF6503

I’m sharing this at

   Make it Yours @ My Backyard Eden   Show and Tell Green

Wednesday, May 5, 2010

Backing a Bookcase

We bought a cheap white bookshelf from IKEA after this move for our books which we didn’t end up having space for in other rooms and to take up a little height on the walls. In Germany, we had the top room with a pitched roof that came down low so we weren’t used to our furniture needing to be tall!

DSCF6394

I have been happy with it, but I had an itch to try out covering the back with fabric or paper. I even considered cheap contact paper but that seemed like it could become a mess!

Since we planned on this room being our guest room originally, we requested it be painted butter yellow. Once we moved in, we decided we liked the room for ourselves, so we’ve had to be ok with our mostly white furniture fading into light colored walls. Backing the bookcase with cheap burlap was one quick fix rather than tackling a repainting job…at least for now!

DSCF6400

The back came off rather easy (thankfully my husband had not glued it together as he’d done with some IKEA assemble-yourself pieces). It is very thin so I could not wrap the burlap around it and staple it (like the bulletin board we recovered). I first tried spray adhesive but it was too non-permanent so I resorted to hot glue. This worked great, but watch your fingers—hot glue comes right through those holes!

DSCF6401

I just took pictures of the finished product tonight so the lighting is different in the before and after. {Reminds me of one of those “What is different in these 2 pictures?” games!}

DSCF6391 DSCF6411


A little closer up {yes, I think they’re cute!}

DSCF6410

and back. 

DSCF6407

What do you think? I’m getting used to since it’s still so new. I’ve definitely happy to have it accomplished! 

If you want to see another example of bookcases backed with fabric, check out the craft room bookshelves at Creating by Cami.  I’ve also seen other furniture lined with old pages from books or music sheets. Log that away for next time!

I’m sharing this at   Transformation Thursday   and  Furniture Feature Fridays

Saturday, May 1, 2010

One Year Old Today

It’s amazing to think I wrote my first blog post one year ago today! And to think how I was in a different country not knowing what was to come. A lot has changed,  and it’s been really life giving to share some of the highlights with you here!

I could go on about how blogging has affected my life and how much I’ve learned. But in lieu of time, I’ll save that for the “about” page I need to write someday!  I really want to thank all of you who take time to read my blog, follow, subscribe, and/or leave comments! It makes it much more fun!

Other folks have give-a-ways and such for their “blogoversaries” (sp?).  That might come later…maybe when I can take something to the US on a plane! Instead, I thought I’d announce my latest venture: my new Etsy shop, Retrosaria Rua!

retrosaria1A

I am an entrepreneur at heart, and my husband has the bug too at times! I’ve found some really cute things here I thought others might think are worth buying. (If not, I know I wouldn’t mind using them!) We prayed about the possibility and felt we had a green light from God. My plan is just to see how things go especially in light of my responsibilities here.

Maybe you noticed the new “Etsy Mini” on the sidebar. If not, please have a look. The picture I used above is part of a gate I pass by in town! You can find out more about the name I chose at the shop.  Check back every now and then to see what I’ve had time to add--it’s taking longer than I thought to get a shop started and list items (learning curve?).

So, thank you, thank you, thank you for letting me share from way over here!!!

LinkWithin

Related Posts Plugin for WordPress, Blogger...