Thursday, January 2, 2014

New Skirt and Stockings

It’s time to take down our Christmas decorations, but I remembered to take a photo of our new Christmas digs now that the presents are gone.

IMG_6769

I finally made new stockings and a new tree skirt from fabric I’ve had for two years! We had been working our way towards a more bright color scheme in our ornaments and such. So glad to have it all come together this year!

IMG_6766

Now for a few close-ups:

IMG_6760

After considering a few one-main-fabric tree skirts, I went with the pie piece cuts to include them all. I found the cute trim at our local Retrosaria, battled with it a bit trying to find a way to sew it on. I relented and used hot glue.

IMG_6763

The stockings were a success in the making only by following the tutorial by Sew Like My Mom. It took a bit of faith to see how it would turn out. You essentially create one solid piece, lining and exterior,

IMG_6527 

stuff the lining in when you’re done

IMG_6528

and fold down the top.

IMG_6530

{Anyone remember the red candy fabric above from 1996 or so? My daughter wanted that for hers over some of the “newer” retro fabric I’d bought. Worked with the color scheme though!}

IMG_6767

My husband wanted a manly stocking, so I made his from a felted sweater I had. {It really works to wash and dry an old wool sweater on hot to get great fabric!} I used the same instructions but had to piece some of the sweater together for the neck of the stocking which is hidden.

IMG_6770

Here they are post-Christmas--not so pristine in shape after being so full! But so nice to have it done and them be well enjoyed!

Tuesday, December 31, 2013

Nativities Around Our Town

Around here we’re attempting to get past a week of illness in our home. It’s not easing up fast! In the meantime, I thought I’d post about a few things I’ve missed. I realize the blog has been dormant for too long!

This year I made sure to take pictures of the nativity scenes in our town, Bombarral. I have wanted to do this for years, so  here are the four we found outside our home. Here in Portugal, nativity scenes are called Presipios.

IMG_6673

On the way out of town is a gigantic Mary and Joseph with baby Jesus. I tried to give some perspective by getting the windows and doors of the quinta in the background. It is awesome to see at night lighted up!

IMG_6676

A little further out of Bombarral close to Carvalhal, there is a nativity set up at an old church.

IMG_6681

Back in town there is a neat silhouette nativity set up at a concrete beam making plant that can be seen from the highway. So nice!

IMG_6670

And up by the church in Bombarral, a life size version complete with date palms this year {and our two cuties}!

I did not get any good photos of the working nativity scene at the Colombo mall in Lisbon. If you’re in town it’s not to be missed. There’s way more than just the manger scene. It’s a whole village of moving figures doing their work. And the cow at the manger is chewing hay and things like that!

IMG_6756

One of the presipios in our home is made up of vintage pieces I’ve found at the flea market, some dressed in traditional regional Portuguese garb. I love how the Portuguese add all kinds of people to come worship baby Jesus!

Happy New Years to you!

Tuesday, July 30, 2013

Zippered Pillows for the Novice

I sewed four pillow covers yesterday. Quite a feat considering I haven’t delved into much craftiness in months! {More finished product photos at the end if you want to skip the nitty gritty.}

IMG_5633

The day before I didn’t have the zippers yet so I cut the fabric for each one. It was actually nice to start the next day with all my materials and everything cut {kind of like a cooking show with each ingredient premeasured in a little bowl!}.

I found a great tutorial which made things SO MUCH EASIER! Check out the most simple pillow cover with a zipper tutorial at Scout and Nimble first. Her instructions and photos are very easy to follow.

So why the post? I sew so {ha!} infrequently that I usually feel like a big novice every time! I thought I’d share some things I learned along the way for any other novices out there. Please, save time from my many mistakes! It was almost laughable today, like when I sewed up the end of the fabric in the zipper seam because I wasn’t careful! If you are a regular seamstress, this post is not for you!
IMG_5622

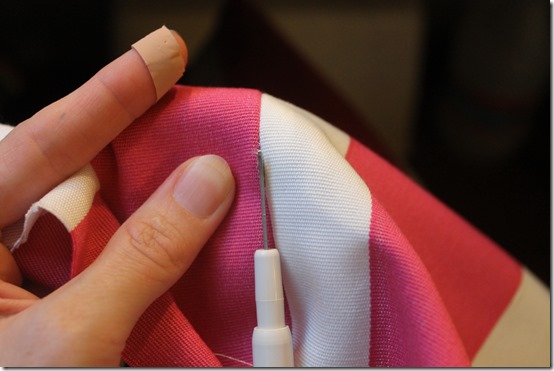
For starters, don’t think you should do a long stitch on that first seam before attaching the zipper thinking it will be easier to rip out. It needs to be a smaller stitch so it won’t pull out when you put a pillow through the hole. The seam ripper will have no trouble cutting through even a smaller stitch.IMG_5623

One problem I encountered was not having zippers the same length as my pillow cover as Jesse did in her instructions. By the time I got to the third and fourth pillow, I started figuring out what I needed to do.

IMG_5621

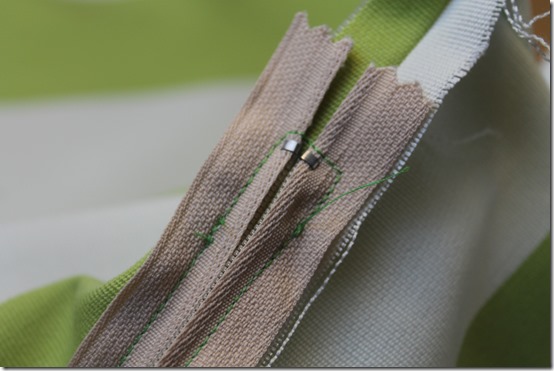
I learned I didn’t need to make the zipper foot on the machine go around the zipper pull, but just stop close to it and come back to that part after I unzipped it a bit. It is loose above, but after ripping the seam open, you can grab the pull and open the zipper some. Then you can sew around the end. MUCH easier and neater!
IMG_5617

You can see in the photo above the green lines I sewed after the back stitching {after I had unzipped the zipper some}.

IMG_5619

I also thought I’d try sewing the zipper to the seam edges only and not through both pieces of fabric to not have the sewing lines seen on the outside of the pillow. It is doable, but in the end I wonder how this pillow {below} will look in the long run. The crease from ironing is the only thing keeping the zipper somewhat hidden. Sticking to the instructions and using the right color thread is the answer I think!

IMG_5627

The floral pillow ended up in our bedroom for now. It’s destination to the patio was routed by a travel pillow on sale at AREA {a fabulous store in Portugal}. That fabric wasn’t made for the outside anyway.

IMG_5635

Outdoor pillows are not that easy to find here in Portugal, if it is possible at all. For all my friends living here, I found outdoor fabric on fabric store row in Campo Ourique in Lisbon, but they only have stripes and solids. It wasn’t expensive at all when you don’t need a whole meter.

IMG_5636

Three pillows made with outdoor fabric, one cheap IKEA solid I had, and my new travel pillow. It might need a mate! Hopefully we can finish up our back patio projects soon so I can post all of it then.

Friday, March 8, 2013

A Rainbow’s End

IMG_4402

Last year I started this small project after seeing a digital version I liked. It took a sick day in January to complete it! So glad now.

IMG_4412

It was fun to add a bit of Spring and Truth in our entryway.

IMG_4406

I made a couple trips to our local retrosaria between last year and this to get a needed button or two to fill in the rainbow well. If you’d like to make something similar, I’d recommend starting with a larger piece of cloth than I did. It got a little tricky trying to keep my piece between the embroidery hoop with all the buttons not wanting to bend on the hoop’s edges.

IMG_4407

The cursive writing was just freehand and the clover is four small hearts ends together. I pulled the fabric around a frame back {with stand} and glued it. I had planned on framing it, but the frame did not have enough space for the back now-covered-in-fabric to fit in its grooves.

IMG_4401

Thankfully it stands well on its own! Happy Spring and St. Patrick’s Day to you a little early!


linking up to Tatertots and Jello ,  and


Sunday, February 24, 2013

Grid for How to Think

Lately, I’ve seemed to be tempted to walk in unbelief or hopelessness about a situation. Thankfully I am reading a great book called Living From the Unseen by Wendy Backlund that challenges my wrong thinking. In Chapter Five, she speaks about “thinking on purpose…whatever is of good report.”

This really hit home with me that there are so many things that God has faithfully done for us, things we never would have imagined, that why do I doubt now? So, I had this idea to make a grid of all the things we should think about from Philippians 4:8 that I could fill in and post somewhere for me to remember!

think grid

It is nothing fancy at all but I thought it might be helpful to someone else too. You can download or print the grid by clicking the link below. It will open in Google docs where there is an arrow to download or a printer icon to print.

Think on These Things Grid

Friday, February 1, 2013

New Planters

I’ve had several plants sitting in my kitchen waiting for a permanent home. Three tiny succulents were in my window sill, and it occurred to me they might fit in the old polka-dot bowl I had sitting next to them.

IMG_3993

Wa-lah! Then began the hunt to find more of these “new” planters. Even though I’d prefer to de-stash, the best bets for these other plants were found at our local flea market. A teapot for my rex begonia…

IMG_3995

The poinsettia from Christmas has been given a chance at longer life too. We’ll see how she fares outside of her Christmas florist donned wrapping.

IMG_4034

I’m hoping the plants will thrive despite the fact I didn’t drill holes in the bottom of these pottery pieces. Just being careful to not overwater. I have used rocks or other objects in the lower sections of vases and pottery in the past to give water a place to go in a way, just not this time. These containers were on the smaller side.

IMG_3994

In the mean time I’m encouraged by prettier plant life in the kitchen in the middle of winter!

Friday, January 18, 2013

First Silhouette Heat Transfer

IMG_3880

One of my daughters picked out a cute top to go with some corduroys for Christmas. It was attached to a plain turtleneck—a two-for-one deal. My other daughter decided she’d like a new printed turtle neck too. I had some inspiration pinned from Hanna Anderson to get this project going.

T-Shirt Idea to try (T from Hanna Anderson)

I got the “cat silhouette” and the “flower tree” from the Silhouette online store.

cat and flower

I curved the flat end of the flower tree graphic a little so it appeared more like a branch than an upside down tree.
IMG_3860

I followed the directions for using the flocked heat transfer material that came in the Silhouette Heat Transfer Starter Kit {thanks Mom!}. I did have to leave the iron on the material longer than it said for a couple of the spots that wanted to come up when I peeled up the transfer sheet.

IMG_3882

The white flocked material picks up every bit of lint so it’s not so clean and white anymore {and it did make it through a normal wash!}. Yet this shirt is still a hit with my 6 year old!

LinkWithin

Related Posts Plugin for WordPress, Blogger...